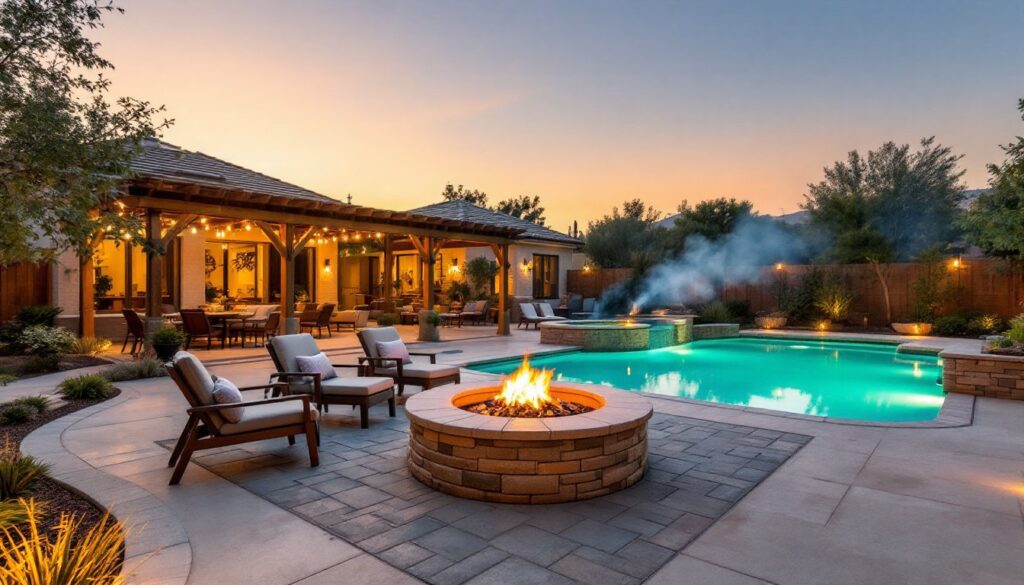
Adding a fire pit near your pool sounds like a luxury resort experience, but it’s an achievable backyard transformation. Whether you’re entertaining or simply unwinding after a long day, a thoughtfully positioned fire pit extends your outdoor season and creates a natural gathering spot. The challenge isn’t whether you should add one, it’s where to place it safely and how to design it to complement your pool area. This guide walks you through safety requirements, design options ranging from built-in structures to portable setups, and practical installation tips that help you avoid costly mistakes. Let’s explore how to bring warmth and ambiance to your poolside retreat.
Table of Contents
ToggleKey Takeaways
- Position a fire pit near pool areas at least 15 feet away from the water itself to prevent deck damage and keep swimmers safe from flames and smoke.
- Use fire-rated materials like clay fire bricks or slate rather than standard brick or granite, which crack under repeated heating cycles.
- A spark arrestor screen reduces flying ember drift by up to 90%, making it the most effective safeguard for poolside fire pit safety.
- Portable steel fire pits offer flexibility and affordability ($150–$600) for renters, while built-in stone or concrete structures create permanent focal points that enhance resort-like ambiance.
- Maintain proper airflow and drainage by backfilling foundations with gravel or sand and leaving the bottom stone layers unmortared to allow ventilation and water drainage.
- Perform monthly rinsing with a garden hose and soft brush to prevent chlorine discoloration on the pit exterior, and allow coals to cool completely before disposing of ash in a metal container.
Safety Considerations For Fire Pits Adjacent To Pools
Before you strike a match, understand that placing a fire pit near water demands serious attention to fire codes and clearance distances. Most jurisdictions require a minimum 10-foot setback from structures, vegetation, and property lines, though some areas mandate 15 feet or more. Check your local building code (typically based on the International Fire Code) because requirements vary significantly by region.
Keep the fire pit at least 15 feet away from the pool itself. This distance prevents deck damage from radiant heat and keeps swimmers safely separated from flames and smoke. The prevailing wind pattern matters too, position the pit so smoke generally drifts away from where people gather, not toward them.
Safety hazards to address upfront:
- Alcohol + fire + water = poor decisions. Establish a no-alcohol zone near the pit, or enforce strict rules about distancing.
- Wet feet and uneven ground around the pit create tripping hazards. Plan level ground and adequate lighting.
- Chlorine vapors can intensify near heated water surfaces. Ensure good air circulation between the pit and pool.
- Ember drift poses the biggest risk. Use a spark arrestor screen (a metal mesh cap that sits atop the fire ring) to reduce flying embers by up to 90%.
Wear safety glasses and heat-resistant gloves when building or tending the fire. Keep a dry chemical fire extinguisher or garden hose within arm’s reach. Never leave a lit fire unattended, especially near water where distractions are common.
If your yard sits on a slope, position the pit at a lower elevation than the pool to prevent ash and debris from washing into the water. Sloped terrain also naturally channels water away from the fire structure during heavy rain.
Built-In Stone And Concrete Fire Pit Designs
Permanent fire pits anchor your poolside landscape and feel like a true investment in your outdoor space. A circular stone ring pit is the most popular choice: stack 8-10 layers of dry-stacked fieldstone or fire-rated brick (standard brick burns too easily) into a ring 3-4 feet in diameter and 2-3 feet tall. The opening should be roughly 2.5 feet across to accommodate firewood and allow proper airflow.
Before stacking stone, dig a level foundation at least 6 inches deep and 2 inches wider than your ring base. Fill it with compacted sand or pea gravel, this prevents settling and creates drainage for groundwater. Avoid mortar in the bottom layers: let them sit loose so water drains instead of pooling inside.
Fire-rated materials are non-negotiable. Standard red brick and granite crack under repeated heating cycles. Use clay fire bricks, slate, or landscape stone rated for high heat. If you’re unsure, contact your local masonry supplier, they know regional code requirements and recommend materials accordingly.
A more polished option is a poured concrete ring. Form a concrete foundation and base ring using 2×8 lumber and rebar, then pour concrete rated for outdoor use (air-entrained concrete handles freeze-thaw cycles better). Once cured, add a decorative stone or coping cap. This approach requires more upfront effort and costs 20-40% more than stacked stone, but it’s cleaner and longer-lasting.
For serious poolside entertaining, consider a mortared stone surround with built-in benches. This transforms the pit into a permanent seating zone and keeps guests at a safe distance from heat and flames. Benches also serve as natural gathering points, much more functional than scattered lawn chairs.
Portable And Flexible Fire Pit Options
Not everyone wants a permanent structure. Portable fire pits offer flexibility, especially if you rent or enjoy rearranging your yard seasonally. A steel fire pit bowl (also called a fire bowl or cauldron) is affordable, movable, and doesn’t require excavation or permits. These range from 20 to 36 inches in diameter and cost $150–$600 depending on material thickness and finish.
Look for heavy-gauge steel (at least 3mm thick) to prevent rust and warping after a single season. Stainless steel lasts longer than powder-coated mild steel, though it costs more. Position the bowl on a fire-resistant pad (ceramic tile, gravel, or a metal grate) to protect your deck from heat damage.
A metal fire ring on a stand is another solid choice. It’s lighter than a bowl, sits elevated for better airflow, and ash drops through a removable bottom grate. These work well on composite decks because the stand keeps the fire source elevated and away from the deck surface itself.
Tabletop ethanol burners and gel fuel cans burn clean with no ash or smoke, making them ideal for small patios and apartments. But, they produce minimal heat and don’t create the full fire experience. Use them for ambiance rather than warmth.
Whenever you place a portable pit, maintain the 10-15 foot clearance from structures and trees, and set it on level ground. Propane fire tables (which combine a table with a gas burner) offer convenience and adjustable heat, but they require a propane line connection and cost $400–$1,200. Gas pits produce no ash but lack the primal appeal of real wood flames. Choose based on your priorities: low maintenance favors gas, while authentic experience and heat output favor wood.
Aesthetic Enhancements And Landscaping Ideas
A fire pit is a focal point, so surround it thoughtfully. Create a circular or semi-circular seating area using flagstone pavers, concrete, or composite decking. This gives guests a defined space and prevents foot traffic from compacting surrounding soil and vegetation.
Rock gardens and strategic plantings frame the pit without overwhelming the space. Use low-growing, drought-tolerant shrubs (ornamental grasses, junipers, or dwarf junipers) at least 15 feet away. These add texture and color without blocking sight lines or creating a fire hazard.
For a cohesive design, echo materials used in your pool surround or deck. If you have a natural stone pool surround, match it with similar stone around the pit. If your deck is composite, a concrete pad under the pit ties the zones together visually while maintaining the practical clearance between fire and the flammable deck material.
Water features like a small fountain or recirculating stream add visual interest and provide ambient sound that masks neighborhood noise. Position these outside the direct heat zone but within sight of the seating area. The visual connection between water and fire creates a balanced, resort-like feel.
Ambient Lighting And Deck Features
Illumination transforms your fire pit zone from a daytime feature into an evening destination. Solar stake lights positioned around the perimeter guide safe foot traffic without overwhelming the fire’s natural glow. They’re cheap ($20–$50 for a set) and require zero wiring.
Low-voltage LED path lighting (12V, hardwired or solar) offers more control and a professional appearance. Plan for lights about 3-4 feet apart around the seating circle. Avoid pointing lights at faces, aim them down to illuminate the ground.
Consider a pergola or shade structure overhead. It won’t block your fire pit entirely but creates a partially defined outdoor room. String lights between posts add warmth and festive ambiance. A pergola also helps disperse smoke and provides shelter if an unexpected drizzle hits.
Deck resurfacing deserves attention too. If your pool deck is aging concrete, repair cracks and apply a concrete sealer before adding the pit zone. Crumbling surfaces around the pit look neglected and create tripping hazards. A fresh acid stain or deck coating breathes new life into the space and ties it visually to the pit area.
Materials, Ventilation, And Installation Tips
Material selection and proper airflow keep your fire pit safe and efficient. Wood-burning pits require a draft, air enters from below, feeds the fire, and smoke exits upward. This means the ground beneath the pit needs permeability. Gravel, sand, or a grate底座 works: solid concrete only works if you drill holes for airflow.
For a built-in pit, excavate the foundation to 8-12 inches deep and backfill with coarse gravel. This prevents water pooling and allows oxygen circulation. If your yard has poor drainage or sits on clay, install a French drain or sump system to channel water away from the pit foundation.
Ventilation gaps between fire ring layers (stacked stone) are essential. Don’t mortar the bottom 4-5 layers: let stone settle naturally so air flows through gaps. Mortar only the upper decorative layers if desired. This preserves draft without sacrificing structural integrity.
Fire grates and cooking grates sit inside the pit to hold firewood or cooking equipment. A simple cast-iron grate costs $30–$80: heavy-duty versions run $150+. Stainless steel lasts longer than painted steel but costs more. Measure your pit opening before buying, standard sizes are 24, 30, and 36 inches diameter.
For installation, rent or borrow a level and a wheelbarrow to haul stone or concrete. A rubber mallet helps settle stone layers without damaging edges. If pouring concrete, rent a concrete mixer for $40–$60 per day rather than mixing by hand, it saves your back and improves consistency.
Permits are likely required if your pit is permanent and larger than 3 feet in diameter. Check with your local building department before breaking ground. Permit costs ($50–$300) are small compared to the headache of a citation or forced removal. Your inspector also catches code violations you’d otherwise discover mid-project.
Maintenance And Seasonal Care For Poolside Fire Pits
Year-round maintenance keeps your pit functional and safe. After each use, let coals cool completely, then remove ash with a metal scoop and hand shovel. Don’t dump ash directly into trash: place it in a metal ash container with a tight-fitting lid until cold, then dispose. Ash retains heat for hours and can ignite paper or plastic.
Spring cleaning involves a thorough inspection. Check stone for cracks or displacement, frost heave in winter can shift structures, especially in northern climates. Replace damaged stone immediately: a loose brick becomes a safety hazard when guests lean on it. Inspect the grate for rust or corrosion and apply a high-heat paint ($15–$30 per can) to seal exposed metal.
In fall, before cold weather hits, seal your stone pit with a breathable stone sealer (avoid water-sealing products that trap moisture and cause freeze-thaw damage). For built-in pits, don’t cover them during winter unless you live in an extreme climate. Tarps trap moisture and promote rot. In snowy areas, let snow accumulate naturally, it insulates the pit and prevents rapid freeze-thaw cycles.
Winter care in cold climates: Drain any water pooled inside the pit. Run a dehumidifier or small fan near the pit if moisture accumulates. After the last fire of the season, inspect the interior for debris and allow it to dry completely before closing it up for winter.
Chlorine from the pool can drift on wind and accumulate on the pit’s exterior. Once monthly, rinse the stone with a garden hose and soft brush to prevent discoloration. Use plain water, never power wash, which damages mortar and stone surfaces.
Repaint or seal the grate every 2-3 years depending on use. Store the grate indoors during winter or cover it with a plastic tarp. Firewood should be seasoned (dried 6-12 months) and stored under a roof but with open sides for air circulation. Wet wood produces excessive smoke and creosote buildup, which eventually cracks the pit structure. Buy wood locally or split your own, suppliers on platforms like Gardenista and community boards often advertise seasoned cords at reasonable rates.
Final Thoughts
A fire pit near your pool transforms your backyard into an all-season retreat. Whether you build a permanent stone structure or position a portable bowl, the key is respecting safety distances, choosing fire-rated materials, and maintaining the pit seasonally. Start with pool maintenance basics to ensure your water stays pristine, then layer in the fire pit design that matches your lifestyle. Your future self, gathered around a warm fire on a cool evening, will thank you for the investment.